|
Making a cross-brace for mounting the router and cutting the lip of the barrel:
In this step, we have to prepare the barrel so that we can add the reinforcement in later. The lip of the barrel has to be shaped to accept the plywood insert, which we do using a router and the circle-cutting jig. Unfortunately, there is no surface for the jig, so we have to attach a temporary one (the cross-brace) and find the center of the barrel. This is actually more difficult than the routing.
- Remove the rings with the crowbar and hammer.
- The top surface of the rim of the drum must be level and smooth. Use a power planer to take off the high spots and smooth it out. You will know when the lip is level, because you will be able to run the planer around the entire circle in one motion without it ever losing its "bite."

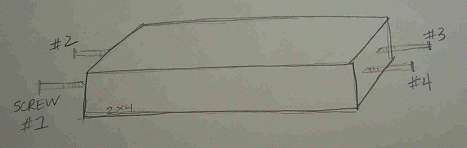
- Time to mount a cross-brace. Use a piece of 2x4 that is short enough to fit in the barrel, but long enough that screws from either side can hold it in place.
- Because the bit on the plunge router will drop down about 2" below the lip of the barrel, the cross-brace must be mounted a few inches down so that the router bit doesn't hit the screws holding the cross-brace. This is easily done by attaching a scrap piece from the plywood insert that you make in the next step. This gives the circle-cutting jig a surface at the level of the lip of the barrel, and keeps the cross-brace mounted down far enough to avoid interference with the router.

- The cross-brace must be level. To do this without too much measurement, hold a ruler across the top of the barrel (parallel to the ground) and hold the cross-brace so that the top surface is pressed against the bottom of the ruler. This will ensure that the cross-brace is level lengthwise.
- 2 people should hold the ruler and cross-brace together while a third drills screw #1 into the 2x4, right through the side of the barrel. The two holding the cross-brace should do their best to keep it equidistant from the two sides even though the third person is drilling a screw into it.

- Now, the ruler should be rotated 90 degrees, so that it is still parallel to the ground, but it is crosswise with respect to the cross-brace. This will ensure that the cross-brace is level width-wise. Hold the ruler and cross-brace together like before. Screw in screw #2 on the same side. Now the cross-brace is mounted and level on one side.
- Repeat on the other side. The cross-brace should now be completely mounted and stable. When screwing in the 4 cross-brace screws, don't try and tighten them too much: the cross-brace is not supposed to be flush with the walls of the barrel. It should be suspended in the middle of the barrel from the 4 screws. Screwing in the 2x4 too tightly can pull the sides of the barrel in so that it is no longer round.
- Find the center of the barrel (which should lie somewhere on the scrap of insert in the middle of the cross-brace). Use a beam compass to find the center-point that allows you to draw the largest possible circle on the rim of the drum without going off the edge. Draw this circle; mark the center.

- Measure 1/2" in from this outer circle and draw an inner circle. Measure the diameter of this inner circle (this will be the diameter of the plywood insert).

- Using a 3/8" bit, drill a hole in the center of the cross-brace. This will be the hole to mount the router and circle-cutting jig.

- Mount the jig. To line it up properly, you will have to adjust the sliding shafts so that the router bit is in the proper position. When lining up the router bit, make sure that you are measuring against the widest part of the bit (most bits are wider in one direction than another; the widest part is what actually will do the cutting).
- Using a 1/2" straight bit with at least a 2" cutting surface, rout the inside of the barrel up to the inner line and to a depth of 2" (right to the top of the 2x4). It is best to take off a slightly smaller radius than one that is too large, so rout up to the inside of the inner circle.

- Tips for routing: Don't try to do it all at once. A little at a time will preserve the blade and tear up the barrel less. Start with the bit up, turn on the router, lower the bit until it bites, then pull the router around the circle. Lower the bit again and repeat. Remember to raise the bit before turning off the router. Lastly, no matter how well made all the tools and jigs you are using, there is always just a small amount of play in the circle-cutting jig. If you consistently press the jig toward the center of the circle as you pull it around, the circle will have a more consistent radius.
- Using a 45 degree bevel router bit, rout the outside edge to the outside line. This is the first step in getting a curved lip on the barrel so the skin will slide smoothly over it.

- Remove the cross-brace and repeat the procedure on the other side.

|
 Introduction
 Process