|
Cutting the insert, fitting it in the barrel, and inserting the support dowels:
In this step, cutting the insert is the trickiest, since it has to be cut to exactly the right size: if it is cut too small, it won't touch the inside edge of the drum. Remember to go slowly when cutting the reinforcement, and be sure to err on the big side, since that is more easily corrected.
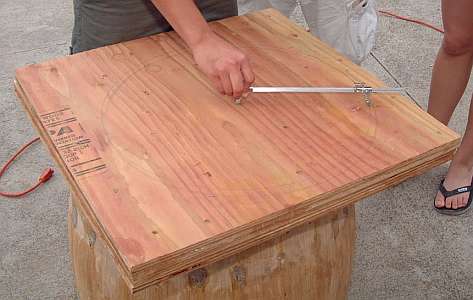
- Use the tack line marking tool to draw a line one inch below the top edge of the barrel. Since the plywood insert is 2" thick and sits flush with the top of the drum, this line will mark the middle of the insert.

Click for closeup
- Turn your attention to the plywood insert. Remove the screws or clamps that were holding the layers together. If a screw breaks, mark it so you don't hit it with the router later.
- Earlier, you drew a circle on the wood that was approximately the right size for the insert. Now, use the beam compass to redraw the circle with the exact size (you marked it down earlier: it is the same as the inner diameter of the barrel). Mark the center of the circle.
- Use the vertical drill guide to drill a hole (3/8" diameter) in the center you marked on the plywood insert. Remove the vertical drill guide.

- Mount the router and circle-cutting jig, and use the 1/2" diameter straight bit to cut out the plywood insert. Cut along the outside edge of the line. Here, the width of a pencil line is critical, so err on the big side. It may help to keep pulling the router away from the center of the circle as you go around, so that any play in the jig will make the insert slightly too big instead of too small.

- Note: cutting the insert with a router is much easier than with a jigsaw, because it allows for greater control.
- Test the insert without removing the router (otherwise it could drop through!). Try to fit it into the lip of the barrel. It should be almost airtight, but if it isn't going in, it is too big. Take off just a little of the edge of the plywood insert at a time, trimming it down until it is the right size. The first pass around, you can keep the diameter of the router the same and push the router toward the center of the circle, so that any play in the jig will make the circle slightly smaller. Usually, this is enough to make it fit.

- Smooth off the edges of the insert a little to get a good gluing surface.
- Make 4 wooden tabs out of scrap wood. These will help suspend the insert so that it doesn't fall into the barrel.
- Screw the wooden tabs to the edges of the insert so that they are hanging over the edge of the insert.

- Paint wood glue on the edge of the insert and the top 2 inches of the the inside of the barrel.
 
- Drop in insert and pound it down so the top edge is flush with the rim of the barrel.
- Put a 'collar' on the drill bit to act as a gage so that you can only drill in about 2".
- Using a 3/8" bit, drill 2" deep holes in each stave, alternating above and below the 1" line (so that you are not drilling into the same piece of plywood).

- Dip the dowels you made earlier into wood glue and pound them into the holes with a hammer (you will know they are in when you hear the pitch change while pounding).

- Use a rag to wipe up any glue that drips out of the dowel holes before it dries and gets gummy.
- Unscrew the wooden tabs from the top before the glue dries (some excess glue will have made it's way under the tabs, so if they aren't removed, they will be attached!).
- Let the glue dry and saw off the ends of the dowels with a handsaw. Don't worry too much about gouging the body or not quite getting the dowel cut flush with the body: the next step is to sand the barrel down anyway.

|
 Introduction
 Process
