Requesting and Configuring a Hostreg-Netname Template
On this page:
Introduction
Stanford Network Self-Registration is an optional service. LNAs can choose whether to set up their network(s) so that end-users will be able to self-register and benefit from the added functionality of the associated Heath Check Tool.
This page provides instructions for LNAs for setting up a network template for Stanford Network Self-Registration.
Requesting a Template
Once you decide to set up self-registration for a network you administer, submit a request to the Departmental Network Engineering group to create the network template. You must submit this request via HelpSU — the following link will open HelpSU request with the request category pre-filled as “Network Connectivity” and the request type pre-filled as “Self-Registration”:
http://remedy-prod.stanford.edu/cgi-bin/helpsu2?pcat=selfreg
Once submitted, your HelpSU request will route to the Departmental Network Engineering Group. Where appropriate, the Department Network Engineer (DNE) assigned to your request may ask you to provide any or all of the following information:
- How many networks are to be set up?
- Network Name or IP Address Range for each template to be created
- Does an admin team exist or need to be created?
- Default Building
- Default Department
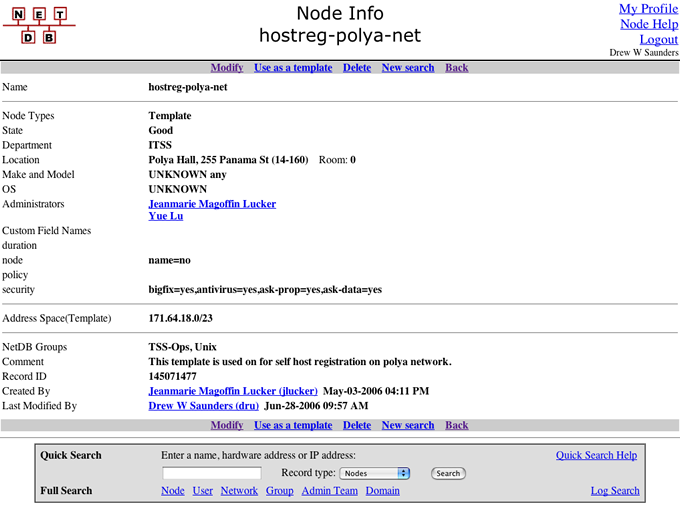
Example of a Completed Template
Modifying Custom Fields
When creating the template, the DNE will set the Custom Fields to appropriate default values. If you leave the Custom Fields blank, they will maintain their default values — but you are welcome to make changes at any time after the template is built. (Over time, you may determine a need to make adjustments, especially to the Department, Admin/Admin Team, and Groups fields.)
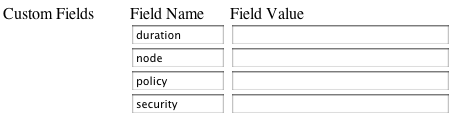
An example of the Custom Fields entry table is shown below with no values displayed.
You need not make changes to the default values: self-registration will work if you leave them as-is. If you choose to make modifications, option values are listed and defined in the table below.
If you modify the default settings, be sure to enter correctly formatted values. (NetDB help is available at http://www.stanford.edu/group/networking/netdb/help/hostreg/helpnetdb.html).
The following table describes the four custom fields along with the string values allowed. Modifying these values will override hostreg service default values. Multiple values should be comma separated. Typos in the custom fields will invalidate the custom field. An LNA may choose to leave all custom fields empty, in which case the column labeled "Default" is implemented.
| Key | Default | Possible Values | Definition |
|---|---|---|---|
| duration | (No expiration set) | time-to-expire=N | Set expiration field to date + N months -9999 means no expiration |
| node | (Name field not editable) | name=<yes | no> exit-url=<http://...> |
Allow users to set their computer name Once registration is complete, send users to this url. |
| policy | user-admin=no proxy-reg=no static-ip=(as described IP table above) roam=all |
user-admin=<yes | no> proxy-reg=<yes | no> static-ip=<all |none| default> roam=<all | none | default> guest-reg=<yes | no | default> |
Allow user to be designated as admin Allow users to proxy register for other users Use this option to override the default IP Policy. "None" means no static IP address are assigned. Use this option to override the default Roaming Policy. "None" means no roaming options. Allow guest registration on this network ( not implemented ) |
| security | bigfix=no |
bigfix=<yes | no> |
Require users to download BigFix |
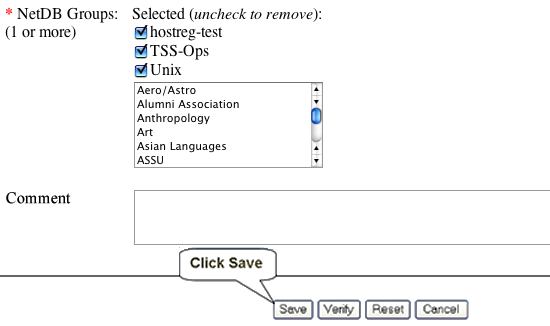
Group Settings
As with the Custom Fields discussed above, the DNE will determine the initial group settings. However, you may opt to change the initial settings and choose the NetDB group yourself. If you make changes, be sure to scroll to the bottom of the screen and click the Save button.
The screen capture below, of the Group Settings entry screen, is an example only.