The
Genius Drive Revamp Project
(OR
Creating a VistaPE USB bootable
thumb drive with PGP by Varun Tansuwan)
V. Integrating PGP
(OPTIONAL)
This chapter is completely
optional and can be skipped. PGP is commercial encryption software to
encrypt hard drives with. If you don't use it in your area, this
chapter does not apply to you. Also note that there are laws governing
the export of encryption software and it is commercial software so none
of those files are distributed here. Also optionally there are
VistaPE scripts you can download using the Download Center for
Winbuilder for VistaPE. They are under Apps\Security and are called
disccryptor.script and TrueCrypt.script if the user wants to implement
something other than PGP encryption.
a.
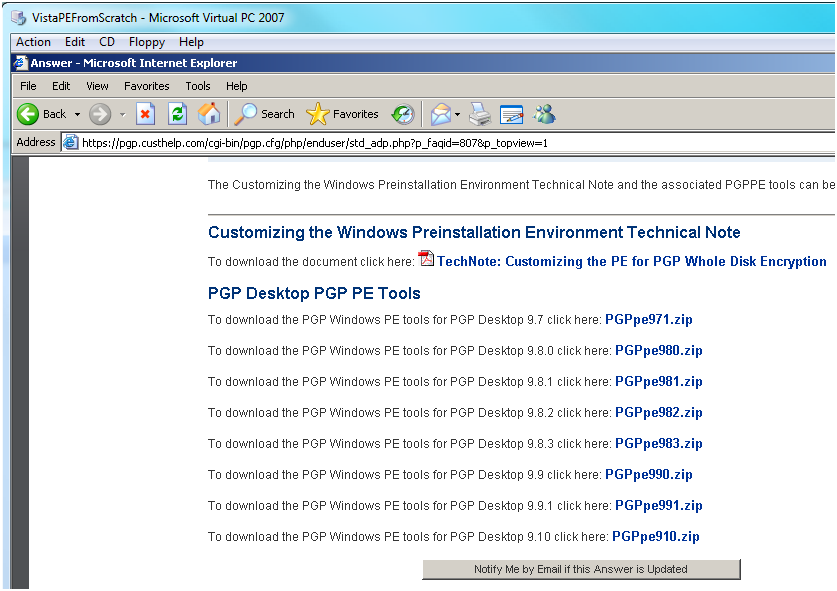
Goto PGP and gt the PE Plug-in
-->
https://support.pgp.com/?faq=807 get
the proper version for
your
environment. Stanford is v991
Note:
It is important to use the SAME version that your area uses otherwise
you may not be able gain access to, and may even corrupt your encrypted
volumes.
b.
Get
Stanford’s PGP Client (
you will
have to use your
own client if you're not a Stanford authorized PGP user)
using the link below. You can install this
under a different clean install VM and then encrypt it and use it for
testing.
Note:
You will have to install it somewhere to get the files
needed or use the below zip file. WDE.zip (removed zip file for global
internet)
http://www.stanford.edu/services/encryption/wholedisk/install_windows.html#c2
c. If you didn’t get the WDE.zip file above then you will
need to
install the Stanford PGP installer file (or your own version) and then
get the files listed in the table below and copy then to C:\WDE\ in
your Genius Drive Development Virtual Machine. Otherwise just extract
the contents of the WDE.zip file so the files all end up in C:\WDE (and
not c:\WDE\WDE etc.)
|
c:\Program
Files\PGP
Corporation\PGP Desktop\pgpbootb.bin
c:\Program
Files\PGP
Corporation\PGP Desktop\pgpbootg.bin
c:\Program
Files\PGP
Corporation\PGP Desktop\PGPwde.exe
c:\Program
Files\PGP
Corporation\PGP Desktop\Stage1 (note
“Stage1” is the filename with no extension)
c:\Windows\system32\PGPsdk.dll
c:\Windows\system32\PGPsdknl.dll
c:\Windows\system32\PGPwd.dll
c:\Windows\system32\drivers\PGPwded.sys
|
d.
Extract the PGPpe-991.zip file (or
your own version) and you’ll probably have to extract a
resulting
zip file (they encapsulate it in another zip file within the original
zip file). PGPpe-991_Inner.zip and extract that to get the
real
two files that we want, pgppe.exe
and pgpstart.exe
put these files in the folder c:\pgp\
e. Open a command prompt and goto c:\program files\Windows
AIK\Tools\PETools and run the following command. Replace the
indicated x86 with your system architecture (amd64, IA64, x86)
copype.cmd x86
c:\winpe_x86\
^^^^
Note: VistaPE can be built on a x64 machine but only VistaPE 32-bit and
not VistaPE 64-bit can be built right now.
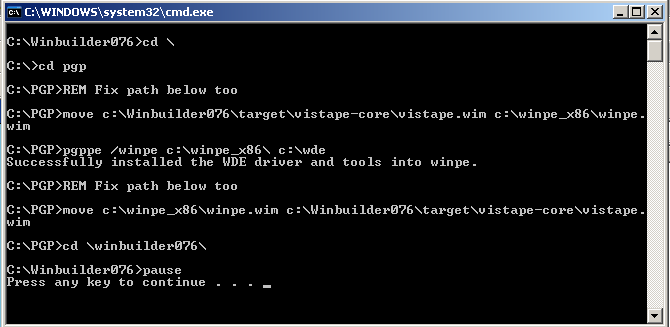
f. Create a batch file called injectpgp.bat and put it in the
Winbuilder076 folder. The contents follow:
cd
\
cd pgp
REM Fix path below too
move c:\Winbuilder076\target\vistape-core\vistape.wim
c:\winpe_x86\winpe.wim
pgppe /winpe c:\winpe_x86\ c:\wde
REM Fix path below too
move c:\winpe_x86\winpe.wim c:\Winbuilder076\target\vistape-core\vistape.wim
cd \Winbuilder076\
pause |
Note:
If your paths are different you will have to fix the file to match your
paths. Replace Winbuidler076\ with your own path. If successful you should
see something
similar to below. Where the WDE driver and tools have been installed
into winpe.
g.
Now back in WinBuilder goto the
section under Finalize called “Create ISO/CD/USB”
Click the
Create a new ISO file (since the VistaPE.WIM file has now just been
updated with the new version). This is basically to repackage the ISO
since vistape.wim has been injected with the pgp plugin. You may now
want to burn and test the
resulting iso file in c:\winbuilder076\iso or copy it out to the
network share and mount it on a VM that has a PGP encrypted HD to test
if it works. Note: if you’re adding DBAN/Parted magic via my
modified scripts below then hold off on this step unless
you’re
testing.

h.
Once booted into VistaPE now PGPWDE
should work from the command line. Hit the Start Button then click Run
then put in cmd.exe and hit ok.
Below are the PGPWDE commands that can be run from the command line to
mount a PGP encrypted HD. Enum is to enumerate list the available
drives. Status will tell you if the drive is PGP enabled/encrypted. In
the Auth line replace xxxx with your passphrase to mount the drive. Note: Those are double
dashes in the
command switches except the -p "xxxx" which is a single dash.
pgpwde --enum
pgpwde --disk 0 --status
pgpwde --disk 0 --auth -p “xxxx”
pgpwde -h |

Woohoo
it works!
Last Update 07-27-2009