Live video streaming via the Internet has come quite a long way since its inception in the late 1990's. Early video streaming was often plagued with a slow Internet, and as a result, a lot of users complained about "buffering". In its early days, live streaming was extremely expensive, and was often restricted to major television stations. With the influx of technological advancements, live streaming has never been easier. In this guide we will go through the basics of setting up a webcam that is capable of streaming a bird's nesting behavior.
Prerequisites
Live video streaming is very CPU intensive, and often consumes a lot of system RAM. Also, there is a lot of video encoding that needs to be done. Additional memory and processing power is required in order to stream a feed in high definition. It is therefore recommended that a computer be dedicated for this purpose.
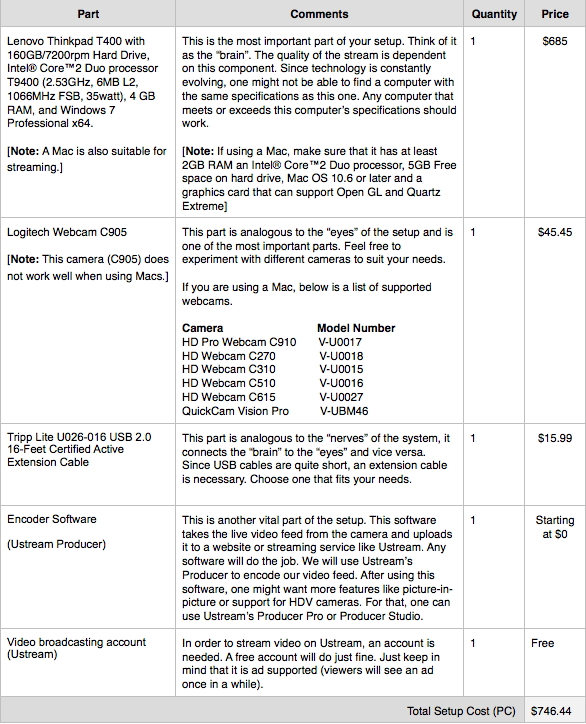
Below is a list of parts required to stream a "California Towhee's Nest".
The Set Up: A Brief Overview
Below is a diagram illustrating how our live webcam will work.
The Procedure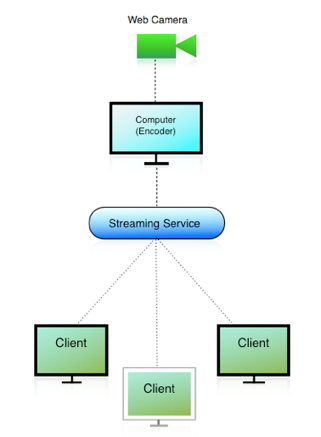
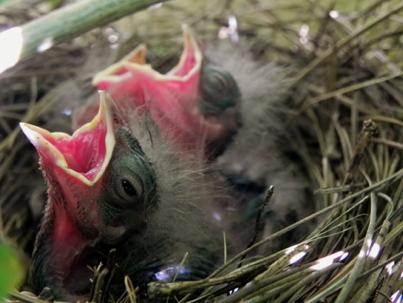
1. Locate the nest you wish to stream.
This guide is based on an actual bird cam, the California Towhee Cam.
2. Measure the distance from the nest to the desired location of the encoding computer.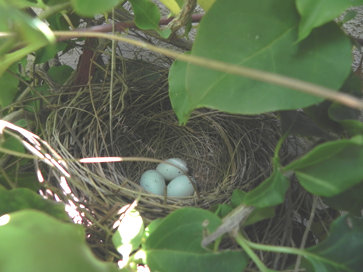
3. Before purchasing or installing anything it is best to draw a blue print of the setup. This will help make planning easier and will save time.
Below is a diagram of the setup for streaming our California Towhee's nest.
4. Purchase USB extension cable(s) according to the distance between the location of the nest, and the encoding computer. [Note: Some USB extension cables come with signal amplifiers, therefore, in those cases a power extension cable is necessary.]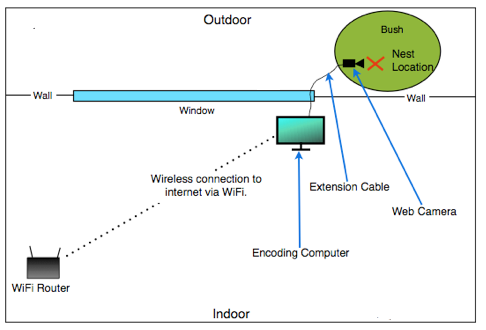
5. Place the web camera near the nest. The Logitech webcam used in this setup features a clip. This clip allows it to be mounted to a branch next to the nest, as opposed to using a tripod.
6. Route the extension cables, and position them properly so that is possible to reach the web camera's USB connector.
7. Plug the camera’s USB connector to the female end of the USB extension cable. Connect any signal amplifiers to the power outlet and plug in the computer’s power adaptor.
8. Let the fun begin! Power up the computer that will be used as the encoder.
9. Once the computer starts up, connect it to a WiFi network, and delete any programs and files that are not needed. Keep in mind that due to the nature of live video streaming, this machine is to be dedicated for video streaming purposes only. This computer is not intended for daily use.
10. After all the unnecessary programs and files have been removed from the computer, it is important that the wallpaper of the computer be set to black, and all transparency effects (e.g., Windows Aero) are disabled. This can be easily done in Windows by accessing the personalization settings. To speed up this process, you can use a theme pack for Windows 7 that will optimize the computer’s personalization settings for you. You can download this file: Streaming Optimizer.
Note: If you are using a Mac you can disable the transparency by typing in these terminal scripts (enter your password and reboot after running scripts):
sudo defaults write /System/Library/LaunchDaemons com.apple.WindowServer 'EnvironmentVariables' -dict 'CI_NO_BACKGROUND_IMAGE' 0
[Second Script]
defaults write com.apple.dock no-glass -boolean YES killall Dock
11. Once all the steps have been completed, now is the time to install an encoding software on the computer. This is the most important software component on the computer, apart from the Operating System. This is what enables the computer to perform the tasks of an encoder. To stream pictures of our nest, we will use Ustream's free encoder known as Ustream Producer. To obtain this software, click on this link: Ustream Producer [Note: if you do not have Apple’s QuickTime 7 plug-in installed in your computer the installer will direct you to QuickTime’s download page, after installing QuickTime you may restart the installer.]
12. Following the installation, plug the other end of the USB extension cable into a USB port of the computer. Wait for a few minutes while the computer searches and installs any drivers necessary for the proper operation of the webcam. [Note: If the computer is unable to automatically install drivers, it will prompt you to manually install drivers by inserting a CD with the camera drivers into the computer. This CD usually comes with the camera, if not, then you can download the drivers from the camera manufacturer’s website.]
13. Following the successful installation of drivers, it is recommended to restart the computer.
14. After a reboot, launch the Ustream Producer software.
15. The software will display a login box, and it will ask for login credentials for a user. If you do not have an Ustream account, you may click on the "Sign up!" button at the bottom of the box.
16. After clicking the "Sign up!" button you will be directed to a web page where you will be asked for personal information.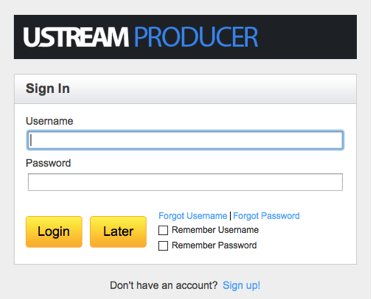
17. After completing the form, you will be asked to join other producers' crowds (i.e., subscribe to their channels), and import friends from other social media accounts. You may skip these steps by clicking on "Find your friends" and "Finish" at the bottoms of those pages.
18. Following the initial setup of your Ustream account you may create a channel by clicking on the "Create a Channel" button. This button will open a dialog box in your web browser asking for a channel name. You may choose any appropriate name for your channel, for example, “Scrub Jay Nest Cam" or "Ruby Throated Hummingbird Cam". After choosing a channel name for your stream click "Create".
19. You will now be guided to a webpage where you can enter information about what you are going to broadcast. You will need to choose category type tags for your channel (e.g., Pets, Animals/Birds) to increase the possibility of finding it in a search engine (e.g., Google), choose a picture for the stream, and write a summary of what is to be featured in the channel. [Note: this text will be viewer readable.] After completing this form, click "Save".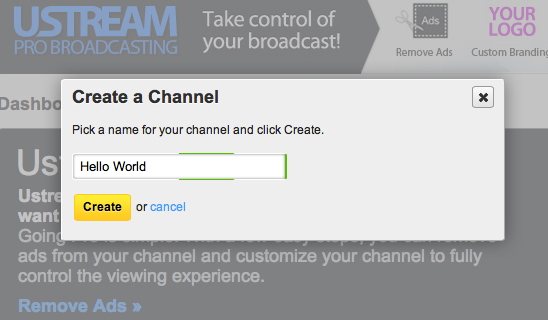
20. You can now log out of this page, and close the window of the web browser. [Below is a screenshot.]
21. You can now log into the Ustream Producer window. If all of the prior steps have been completed successfully you can now see the bird's nest from the webcam in the producer window. You may now change the position of the webcam in order to get a better view of the nest if necessary.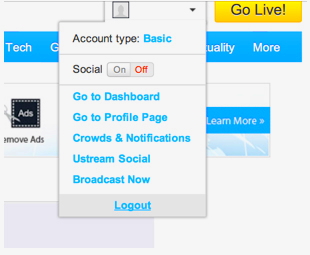
22. If everything looks fine you may start the broadcast by clicking on "Start Broadcasting".
23. You will want to visit your channel page to test if the camera is streaming. You can do this by clicking on the "Chat" button. Clicking this button will open a webpage that is the site of your stream. If you are able to see the bird's nest video feed, then everything is working perfectly.
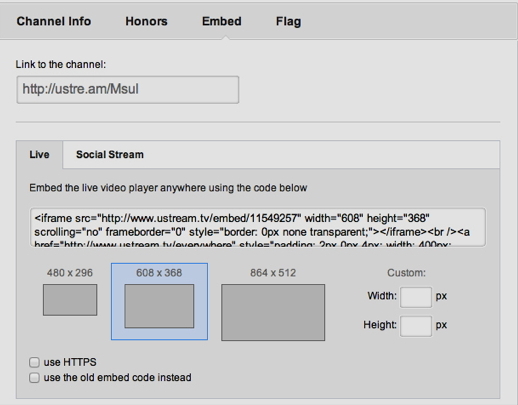
24. If the camera streams video, you can share the URL of your channel with others [your channel’s URL is usually http://www.ustream.tv/channel/your-channel-name (Note the "-"s between words)]. You can embed the live video on your website by clicking on the “Embed” tab and copying the embed code from the box to your website. [Below is a screenshot.]
25. Congratulations, you should now have a working bird cam streaming live 24/7!
07/22/12